How to install and run TensorFlow on a Windows PC
If you're involved with machine learning, you probably heard the news by now that Google open-sourced their machine learning library TensorFlow a few weeks ago. Excited to dive into TensorFlow, I went to their download and installation page and was disappointed to discover they didn't offer any support or instructions for Windows users.
**Update on November 29, 2016: TensorFlow 0.12 has added support for Windows 7, 10 and Server 2016 today. I'll preserve the rest of the article below in case it's of any use, but you'll probably want to just use the latest version of TensorFlow and follow my new guide here that doesn't require Docker or Oracle VM VirtualBox.
But they did have a Docker image! In case you haven't heard, Docker is a container that wraps up a piece of software in a complete filesystem that contains everything it needs to run: code, runtime, system tools, and system libraries. And Docker is available on Windows.
How I was able to run TensorFlow on my Windows machine
First, I installed the Docker toolbox for Windows.
(A quick aside -- As of June 2016 it looks like you can use Docker Toolbox for Windows for Windows Windows 7 or 8 and the newer, currently in beta Docker for Windows for Windows 10. Note the absence of the word 'Toolbox' if you are using Windows 10. Docker is confusing.
Then I opened up the Docker Quickstart Terminal.
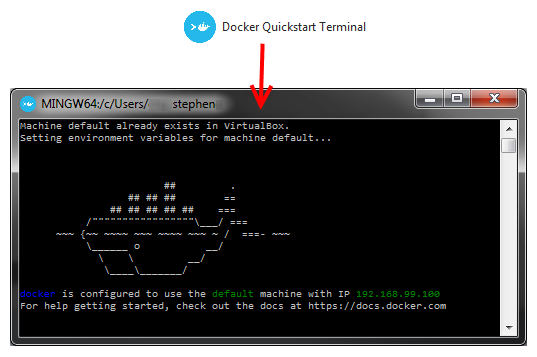
It created a default Docker machine for me. You can view the Docker machines available by typing docker-machine ls
$ docker-machine ls
NAME      ACTIVE   DRIVER       STATE     URL                         SWARM
default   *        virtualbox   Running   tcp://192.168.99.100:2376
I then created a second (new) Docker machine named vdocker by typing:
$ docker-machine create vdocker -d virtualbox
Because I was behind a corporate web proxy, I had to connect to that machine and configure it to use my proxy. This step may not be necessary for you. If you're having other issues with Docker due to a firewall or web proxy, see my post here.
$ docker-machine ssh vdocker
sudo -s
echo "export HTTP_PROXY=http://proxyhost:8080" >> /var/lib/boot2docker/profile
echo "export HTTPS_PROXY=http://proxyhost:8080" >> /var/lib/boot2docker/profile
exit
exit
$ docker-machine restart vdocker
You exit twice, first to get out of root access, and second to get out of the docker container.
Now if you type docker-machine ls you should see your two Docker machines
NAME      ACTIVE   DRIVER       STATE     URL                         SWARM
default   *        virtualbox   Running   tcp://192.168.99.100:2376
vdocker   -        virtualbox   Running   tcp://192.168.99.101:2376
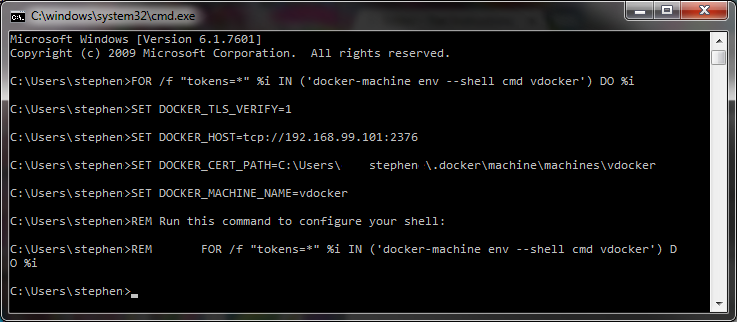
Okay, now the Docker machine called 'vdocker' has been created and configured. Now to actually install TensorFlow. Open a Windows cmd prompt (not the Docker terminal) and enter the following:
FOR /f "tokens=*" %i IN ('docker-machine env --shell cmd vdocker') DO %i
You should see some output from the Docker machine like the following screenshot
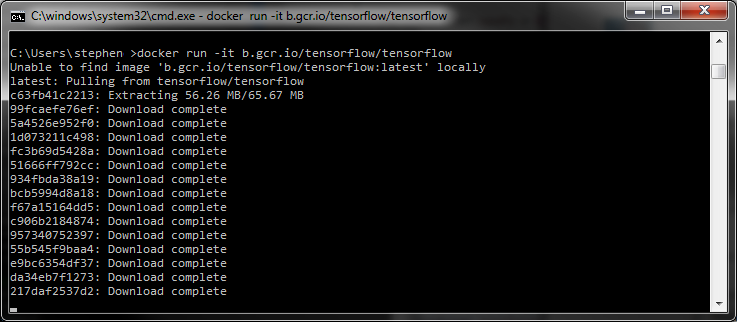
Then type the following line (from the Docker install page):
docker run -it -p 8888:8888 gcr.io/tensorflow/tensorflow
And it should start downloading the image which looks like
Because I was behind a corporate web proxy I initially got a docker: An error occurred trying to connect: Post https://192.168.99.101:2376/v1.23/containers/create: Forbidden. which was was resolved by making a proxy exception using these steps.
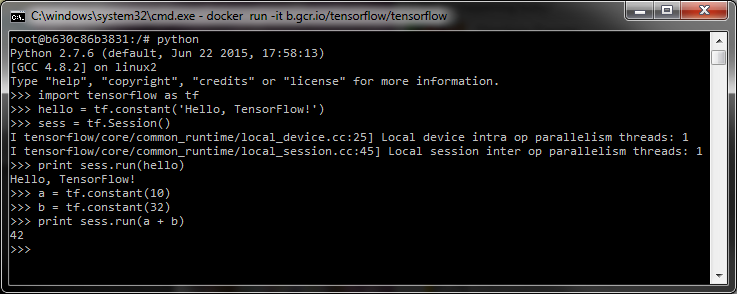
After it's done pulling the files and uncompressing them you should get a linux shell. Go ahead and type python and try out TensorFlow on your Windows machine*!
*Technically you're running TensorFlow in a Docker container in a VirtualBox Linux virtual machine running in a Windows PC.
Here's the code from the above image:
$ python
...
>>> import tensorflow as tf
>>> hello = tf.constant('Hello, TensorFlow!')
>>> sess = tf.Session()
>>> print sess.run(hello)
Hello, TensorFlow!
>>> a = tf.constant(10)
>>> b = tf.constant(32)
>>> print sess.run(a + b)
42
>>>
Enjoy using TensorFlow on your Windows computer! If you had any Docker errors and/or are behind a web proxy see the notes here.